

Webflow Forms are a really easy and quick way to add forms to your own website. However, the problem is often spam bots, which exploit them and overwhelm them with spam messages.
In the worst case scenario, at some point, you can no longer distinguish real inquiries from fake ones and lose valuable leads as a result of the mass of messages.
A reCAPTCHA can help here. reCAPTCHA is a Google service that provides forms with an additional function that can filter out spam very effectively. And most people know this function: the small checkbox with the statement: “I am not a robot.”
How can I add a reCAPTCHA to my Webflow forms?
Integration is super easy. Simply follow the steps below.
1st page Register and generate API keys
To use reCAPTCHA, you must register your website on the Google Cloud platform for free.
- Go to the Recpachta page from Google
- For ReCaptcha type, select “Task (v2)”
- Check the “I'm not a robot.” boxes option
- Add the domain to your site
- Click “Send.”

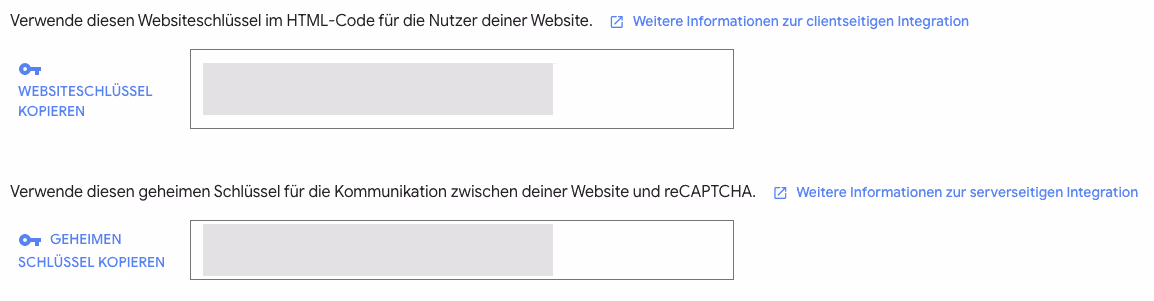
It may take a few minutes to register the domain, but then you should have both the Web site key, as well as the Secret keys be displayed.
2. Activate reCAPTCHA for your Webflow forms
Before you take action and activate reCAPTCHA in Webflow: as soon as you activate reCAPTCHA in your site settings, validation becomes mandatory for all forms. This means that no further form data can be transferred until you have completed the setup.
- Open the Site Settings of your Webflow website
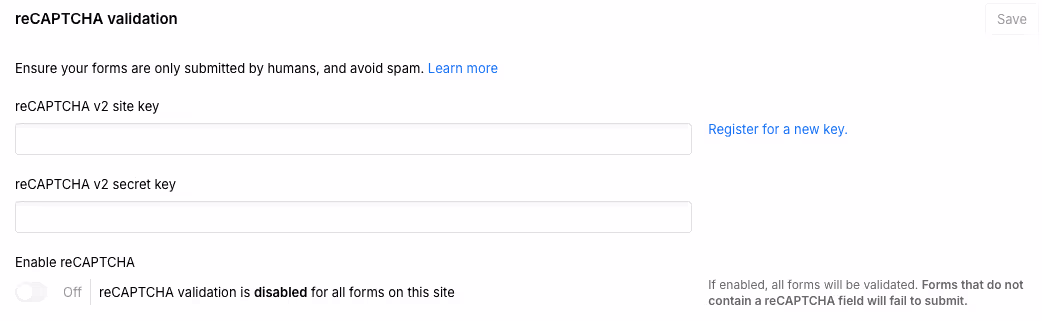
- Navigate to the “Forms” tab and find “reCAPTCHA Validation”
- Paste the website key into the first “reCAPTCHA v2 site key” field
- Paste the secret key into the second field “reCAPTCHA v2 secret key”
- Activate the checkbox under “Enable reCAPTCHA”
3. Include reCAPTCHA in all forms
The technical setup is now complete. Now open the designer and integrate the reCAPTCHA element into all your forms. It is extremely important that you really equip all forms with the element. Otherwise, forms without reCAPTCHA will no longer be sent. Unfortunately, there is no option to only equip selective forms with reCAPTCHA.
Once all forms are ready, press Publish again and test all forms so that no errors occur.
